If you’re just joining us, this is the second part in a three-part series that speaks to the history of night photography, the light-painting process and equipment photographers use, as well as an in-depth look at one of our most memorable light-painting experiences. To get an idea of where this technique originates, please be sure to head over to Part One. Yesterday I mentioned Chris and my little excursions out to the train yard and to rural Wisconsin farm fields. Well these little adventures paved the way for bigger ones. Our road trips ventured out of state and our subject-matter became more elaborate. If it was a sunken copper dredge in the middle of the Torch Lake near the northern-most tip of Michigan’s Upper Peninsula, we were off to find it. Perhaps it was an abandoned amusement park surrendered to the earth and the elements, tucked away in Medina County, Ohio, we were off to find it.
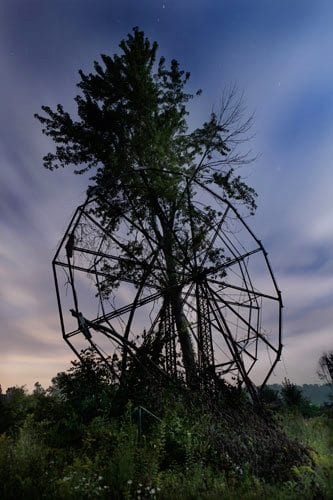
Chippewa Amusement Park – Ohio
Or maybe it was a lonely, dusty ghost town in the heart of the Mojave Desert, 2000 miles away, well, we were most definitely off to find it.
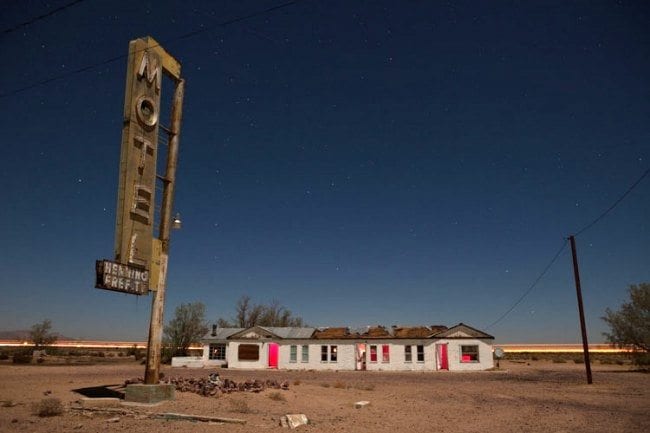
Henning Motel – Newberry Springs, CA
We’re obviously road-trip AND photography junkies, so our two hobbies go hand-in-hand. And as you’ve undoubtedly noticed, on our Route 66 journeys it’s always been light-painting by night, Polaroid by day. (No matter how late into the wee hours the former can take us.)
Followed closely after “How do you do it?” one of the most popular questions we receive from those who stop at our art booth is “How do you find these places?” Chris can spend a multitude of hours scouring Google Satellite for hidden gems. And occasionally he stumbles upon a great old car, house or gas station just driving country roads. Chris also has a network of urban and rural explorers to thank for being the trailblazers. To name just a handful, photographer Brett Stoddart [Tidy Photography] provides a true wealth of knowledge when it comes to Wisconsin’s countryside. Talented and wise beyond her years, Kenzie Alizabeth acted as our guide when we visited Wichita’s famed Joyland Park (and her rural Kansas photography is fresh and beautiful!). Professor of Marketing at West Texas A&M and fellow-explorer, Dr. Nick Gerlich, gave us the scoop on finding the much sought-after and long-abandoned Route 66 Painted Desert Trading Post. And of course, aforementioned light-painters Noel Kerns and Troy Paiva have shared a treasure trove of southwestern desert locations. Additionally, there are countless websites and forums devoted to sharing spaces and places worthy of exploration.
The equipment necessary for a magical night full of light-painting can be as simple or as elaborate as you’d like. The camera fanciness isn’t all that important. Chris uses a Canon 5D Mk II with a wireless shutter release. For quick 30 second exposures I’m able to use my Canon 60D with on-camera shutter button just fine (great for capturing quick car trails!). Troy Paiva has often used his nearly decade-old Canon 20D and a standard “analog” film camera before that. As long as you have the ability to manually adjust your shutter speed, you’re set. And along with a tripod, the only items absolutely necessary for light-painting are:
- Internal Light: An average flashlight goes for $10-$20 at your local market.
- And/Or External Light: Moon, streetlights (but beware of the yellow-tinged sodium or green-tinged mercury vapors they emit all over your subject), flash and/or strobe lights 3. Color: Rosco stage/theatre gels are the go-to for most light-painters; any kind of colored gel or reflector will do the trick.
For the best of all worlds, you can pick up some cheap colored flashlights OR you can go all out and pick up the new highly-customizable ProtoMachines Full Color LED Light for $400, an incredible contraption Troy Paiva has dabbled with lately with striking results.
At the end of the day, however, it honestly doesn’t take much. But to get a good start, here’s a quick snapshot of the gear Chris typical totes along—more if the location is easy to get to, less if the location requires a hike in.
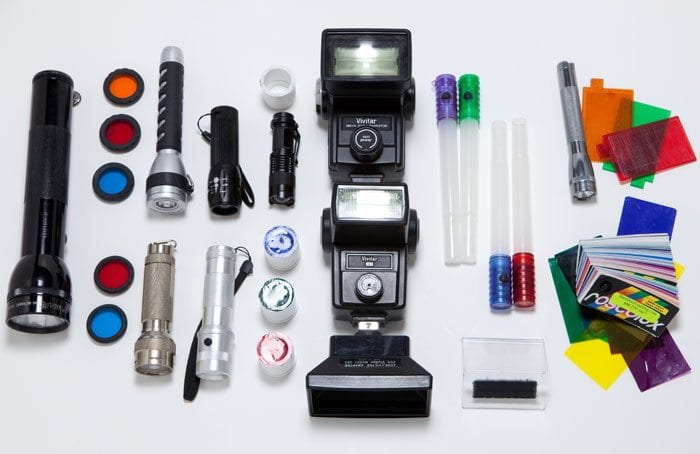
Our light-painting gear
Strobe Lights
- Vivitar 283 + Lens/Filter Adaptor
- Vivitar 285HV with built-in filter slide
- Canon 580EX II (not pictured) + plastic gel holder from Gelholder.com
- [NOT PICTURED] ProtoMachines Full Color LED Light
Flashlights
- Color Shine Multi-Color LED Light
- Mini Maglite
- Million Candlepower Spotlight, aka: Deer Spotter (not pictured) – used for focusing the camera lens on structure
- Mini CREE Q5 LED light – replaced the bulky, heavy, cumbersome Million for focusing; also used with gel-covered PVC pipe for color-lighting interiors
Color
- Rosco Stage/Theatre Gels
- Vivitar Color Wide Filters
- Life+Gear Colored LED Glowsticks – handy for placing into small or tight spots like cars
- 1” PVC caps with circular-cut gels glued to the top – fits over CREE flashlight
Most of this fits nicely inside a small bag, but the Vivitars can be a little bulky, so sometimes Chris won’t even bring those along, especially for smaller spaces that can easily be painted with compact flashlights. Larger jobs, like the Painted Desert Trading Post—which we’re stoked to tell you about in the final installment—require all hands on deck. You don’t want to forget anything at home when you’re making a three-mile trek into the desert by foot!
Giphy fun – I’m in there, laying in owl excrement!
In terms of light-painting techniques, the sky’s the limit! Popping a Vivitar strobe at the wall and ceiling inside of a space is a quick and easy way to get the job done. But with nearly blinding flashes in complete darkness, it’s a little tricky to see exactly what you’re doing and where you’re going. So remember to explore your space before stepping inside! Even in a small space like this electric car, I looked for missing floors and found a bunch of owl poo! No big deal, but nice to be aware of what I was sitting in to avoid being seen by the camera.
Secondly, you really don’t have as much control with a Vivitar and you may find yourself running back and forth from your camera preview screen to the subject-matter fixing your “mistakes.” Using simple flashlights to literally paint the interiors may not project as bright of a color in a short amount of time, but you have far more control and can see where you’re stepping.
Meanwhile you also have a powerful moon to worry about. If it’s completely full with no smog or clouds, it’ll cook that image in no time. So you might not have the luxury of painting away inside for minutes on end. If the moon is low in the sky, waning or a thick cloud cover has entered the scene, you’ll have that shutter open for much longer with a lot more time to spend inside.

Light Painted Night Photography – Troy Paiva
It’s all about experimentation and your sense of style and creativity. Awhile back, Noel Kerns was interviewed by Photogrill.com about his gear and his technique, but also the importance he places on the “pre-vision” especially when working indoors with no moon and no ambient light to speak of. When it’s pitch black, you better know exactly what you’re about to try to accomplish! Likewise, for a super detailed and in-depth look at techniques and tips, check out Troy Paiva’s 81-page digital book Light Painted Night Photography: The Lost America Technique. OR if you’re really in it to win it, take his Night Photography Workshop!
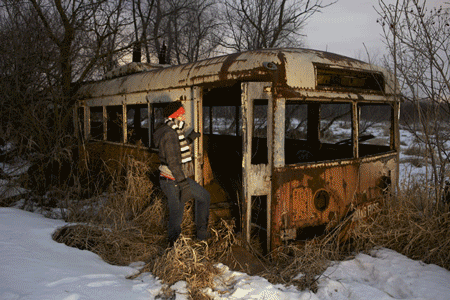
To tell you light-painting and night photography is an adventure doesn’t do it justice. Yesterday I mentioned how thrilling it was the first time I joined Chris and it was just a simple vintage rail car in a train yard right near my apartment. Technically we weren’t supposed to be there and it wasn’t necessarily the safest place in town, so that made it exciting, but Chris has dealt with much scarier experiences…like his run-in with the angry, gun-toting, drunken owner of an abandoned farmhouse, for example. But our experiences are usually riveting in a much more positive sense. One late Saturday night a couple months ago, we explored and light-painted the guts of a Milwaukee icon–the Sydney Hih building, along with the famous Unicorn club. Long abandoned, Sydney Hih’s death is officially upon us because as of today it is being demolished gigantic chunk by gigantic chunk. It was thrilling to explore such a grand space, but also amazing to see a piece of history that will disappear off the face of the earth completely in a few days.
Still standing after half of a century, however, about 1500 miles away from us is a simple and yet beautiful little building sitting comfortably in vast desert. Join us tomorrow when we tell you about one of our most memorable excursions to date.
Great stuff here! Haunting, mysterious, explorative and lots of unanswered questions. Beautiful work!
Thank you so much Joe!! Another full moon is upon us. We really want to get back out there but it’s been so cloudy here in Wiscy. Hopefully it clears up in the next few days!